
Backing up your iOS device is something every iPhone, Ipad, or iPod user must hold sacred. You certainly would not want to risk losing all your important data. Lost or damaged data may be difficult to retrieve or, worse, never at all. A variety of backups protect different kinds of data as well as various combinations of devices. Some solutions back up only selected devices, such as your PC and Mac, but do not protect your mobile iOS devices. On the other hand, other backup solutions protect all of your devices.
A backup allows you to copy and save information from your iPhone, iPad, or iPod. Should you wish to replace your device, you can safely and conveniently use a backup to transfer the same information to a new one.
Why is iPhone Backup Important?

iOS device users experience problems and issues with their digital devices, be it an iPhone, iPod, or Ipad. Backing up your device, therefore, saves you both the heartache and the stress that come from suddenly losing or damaging the most crucial information and data stored in your digital device.
Of primary importance is performing regular backups. Backing up the iPhone, iPad, and iPod every 2 weeks is a sure and safe way to prevent massive data loss in case something goes wrong. Consider having a backup as the most secure precautionary measure you can take to protect all the data and information stored in your device. Failure to do regular backups may result in you losing more than just your directory or contact list and could prove to be fatal.
How do I Back Up My iPhone?
There are various ways and methods available to back up your iPhone. Here, we will discuss how you can back up your iPhone using your Windows personal computer, and your MAC and how you can have an alternative backup using iCloud. Choose the method which best suits your situation and preference. Below are the simple steps for every available option.
Back-Up iPhone Using Your Windows PC


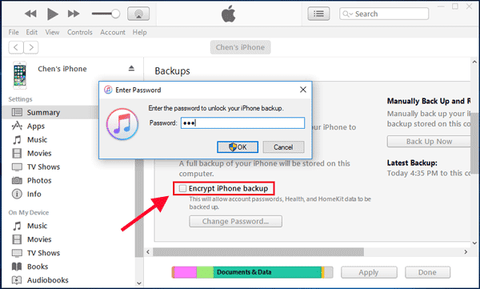
To check and view the backups stored on your computer, choose Edit > Preferences, then click Devices. Note that encrypted backups have a lock icon in the list of backups.
Should you prefer to connect your iPhone to your computer wirelessly, you may do so effortlessly by setting up Wi-Fi Synching.
Back-Up iPhone Using Your Mac
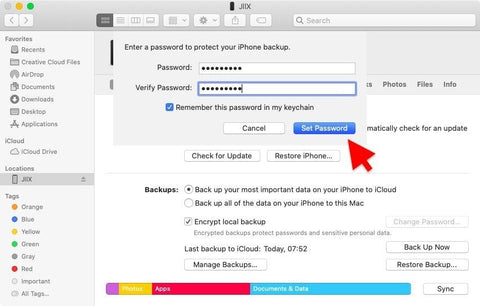
To use the Finder to back up iPhone, macOS 10.15 or later versions are required. With earlier versions of macOS, use iTunes to back up your iPhone.



Should you prefer to connect your iPhone to your computer wirelessly, you may do so effortlessly by setting up Wi-Fi Synching.
Back-Up on iCloud
Go to Settings> (Your Name) >iCloud > iCloud Backup.

iCloud automatically backs up your iPhone daily when iPhone is connected to power, locked, and connected to Wi-Fi.

2. To perform a manual backup, tap Back Up Now.

To view your iCloud backup settings, go to Settings > (Your Name) > iCloud > Manage Storage > Backups. Choose a backup from the list to delete a backup, then tap Delete Backup.


One important thing to note is that when you turn on an iCloud feature (such as iCloud Photos or Contacts) in Settings > Your Name > iCloud, its information is stored in iCloud. Because the information is automatically updated on all your devices, it is not included in your automatic iCloud backups.
Find iCloud Backup Size
Check your iCloud storage and Next Backup Size in iOS or iPadOS by performing the following steps:


Go to Settings > (Your Name).
3. Tap Backups, and then tap the device you're using. The Next Backup Size is listed under Last Backup and Backup Size.
Cloud Storage Providers
What does device storage mean? It simply pertains to the available storage on your iPhone, iPad, iPod, Mac, or other Apple devices. With iCloud storage, storing your content in the cloud helps optimize your storage and access files on any of these devices.
Device storage
Apple devices such as iPhone, iPad, iPod, or Mac come with a set amount of storage. The more storage space your device has, the more music, apps, photos, and other content you can store and enjoy on that device. If your device storage space is about to reach its limit or gets full, you will receive an alert notification.
Here's how to check the amount of device storage you've used and, if needed, optimize and manage your storage space.
Check The Device Storage on Your iPhone or iPad.

3. Tap iPhone Storage or iPad Storage to check the amount of device storage that you've used.
Check The Device Storage on Your Mac
2. Select Storage to check the amount of device storage that you have used.
To help optimize your storage, you can also use iCloud storage. You can use iCloud storage to keep contact directories, photos, videos, device backups, and more, and to access this content from all of your devices. If your device storage space is about to reach its limit or gets full, you will receive an alert notification or have the option to buy more.
Check Your iCloud Storage on Your iPhone or iPad

3. Tap iCloud to check the amount of iCloud storage that you've used.
Check Your iCloud Storage on Your Mac


3. From the sidebar, select iCloud to check the amount of iCloud storage that you've used.
Check Your iCloud Storage on The Web
3. Check the amount of iCloud storage that you've used.
This iPhone Cannot be Backed Up Because There is Not Enough iCloud Storage
Learn what to do if you need help backing up your iPhone, iPad, or iPod touch with iCloud Backup and you receive an alert notification that says there is not enough iCloud storage.
First, check how much available iCloud storage you have, and check your Next Backup Size. Then take steps to reduce the amount of information you store in iCloud, or upgrade your iCloud+ plan.
Check your iCloud storage and Next Backup Size in iOS or iPadOS

4. Tap Backups, then tap the device you're using. The Next Backup Size is listed under Last Backup and Backup Size.
Note that your device may take a few minutes for your backup size or delete information to calculate Next Backup Size.
If your available iCloud storage is low
3. If you still need help, contact us today.
If a message says that your last backup couldn't be completed
Check that you are connected to secure Wi-Fi.
3. If you still need help, contact us today.
If your iCloud backup is taking longer than expected to complete
Check that you are connected to secure Wi-Fi.
2. Leave your device connected to power and Wi-Fi for 24 hours. If your backup still isn't done, archive important data then Contact Square Repair.
If the iCloud backup option is greyed out
2. Check whether you installed a profile that restricts iCloud Backup. Go to Settings > General > Device Management to see a list of installed profiles.
Buy More iCloud Storage

iCloud+ is Apple’s premium cloud subscription service. It offers you more storage for your photos, files, and backups, as well as additional features including iCloud Private Relay, Hide My Email, and HomeKit Secure Video support. There are different plans available depending on the country and region you are in and your choices will be largely dependent on your personal preferences, service needs, and budgetary considerations.
After you upgrade, your storage and features will become available immediately, and your monthly payment date will reflect the purchase date for your plan. If you upgrade from one paid plan to another, your existing plan will be canceled and you will be charged the prorated cost of your new, larger plan.
You're billed every month for iCloud+ unless you downgrade or cancel your plan. Each month you'll get an email to remind you of your upcoming payment.
Whether you are an iPhone, iPad, iPod touch, Mac, or PC user, upgrading to iCloud+ is simple. Select your preferred device below and buy more iCloud storage by following these few quick and easy steps.
How to Upgrade on Your iPhone, iPad, or iPod Touch
3. Choose a plan and follow the onscreen instructions.
How to Upgrade on Your Mac
5. Click Next and enter yourApple ID password.
How to Upgrade on Your Windows PC
5. Enter your Apple ID password, then click Buy.
Bonus Tip: How to Restore Your iPhone From a Backup?

Finally, as a bonus, Square Repair has prepared these tips on how to restore your iPhone from a backup either in iCloud or on your computer. Read on and learn more.
Restore Your Device from An iCloud Backup
7. Now you can finish the setup process and enjoy using your iOS device. Contents such as your apps, photos, music, contacts, videos, and other information will continue to be restored in the background for the next few hours or days. Again, remember that the length of time to complete the process depends heavily on a load of information you will require. You should try to connect regularly to Wi-Fi and power to allow the process to finish.
Restore Your Device from A Backup on Your Computer
6. Make sure to keep your device connected after it has restarted and wait for it to sync with your computer. You may disconnect after the sync has been completed.
How to back up iPhone, Ipad or iPod may seem tedious and challenging at first. But just like any other technology-driven process, familiarizing yourself with your backup apps simply takes time and some getting-used-to. Sooner or later, you will find yourself well attuned to regularly back up your iOS device to protect your iPhone data and information that are vital to both work and leisure.