

There are many reasons why someone may want to know how to block a number on iPhone. It can be due to a stalker, a scammer, or spam caller. Whatever the reason is, you’ll be happy to know it is easy to do!
Follow the steps below to know how to block a phone number on iPhone in several ways:
iPhone still not working properly?
If the guide does not solve the issue, contact us to check whether hardware diagnosis is appropriate. Standalone software repairs are not offered.
Book a mobile phone diagnosisView iPhone repair options
Square Repair is based near Liverpool Street in London and supports walk-in, mail-in and courier repair routes.
How To Block A Number on iPhone

4. Select that option and you’re done!
How To Block A Number on FaceTime

4. Select that option and you’re done!
How To Block A Number on Messages
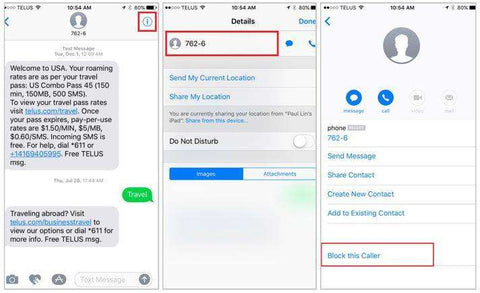
6. Select that option and you’re done!
How To Block A Number on Mail

4. Tap block contact and you’re done!
Important Things To Remember When Blocking A Contact
Once you are able to block a phone number, email address, or contact, they are still capable of leaving a voicemail. However, even if they choose to do so, you will no longer get a notification.
Messages sent or received will not be delivered anymore.
All emails from a blocked contact automatically go to the Trash folder. This works across all of the Apple devices with your email address synced.
Lastly, the contact that you blocked will not receive a notification whatsoever that the phone calls, messages, or emails they sent have been blocked from your device.
Manage your blocked phone numbers, contacts and email addresses
After time has passed, you may want to check the list of phone numbers, contacts, and email addresses that you have blocked on your Phone app, Messages app, FaceTime, or Mail. To do so, follow the steps below:
Phone
Settings > Phone > Blocked Contacts

FaceTime
Settings > FaceTime > Calls > Blocked Contacts

Messages
Settings > Messages > SMS/MMS > Blocked Contacts

Settings > Mail > Threading > Blocked

After accessing the lists, you can simply add to them or remove the users you have previously blocked.
You’re All Set!
Now that you know how to block a number on iPhone, you can easily filter out the notifications, calls, messages, and emails you receive. This makes for a cleaner and more peaceful experience with your Apple device.
You May Also Like
Speaking of maximising your iPhone experience, check out the links below if you need to get repairs on your iPhone!
We cater to screen replacements, battery replacements, camera lens repairs, charging issues, general diagnosis, and much more!
iPhone 12 repairs and parts replacements
iPhone 11 repairs and parts replacements